The time it requires to disassemble an iPod varies with skill and equipment. It varies between several hundredths of a second or up to an hour depending on if one decides to use a solid, unyielding concrete surface or tiny electronics tools.

Taking apart iPods is like building a lightsaber in reverse. Only a skilled individual can do it, it is very tedious, and you need the Force to be able to manipulate things you cannot see or touch.
Apparently people were getting into the 4rd generation iPod Classic too easily. So Apple reengineered the 5th generation to be covered by a single anodized aluminum face plate that is held in place with aluminum clips. The non-flexing aluminum ensures that the rigid metal plates are held together tightly. Furthermore, any excessive attempt to open the case will cause a small cantilevered hammer to swing against a tiny glass vial of vinegar, flooding the cabinet and thus dissolving the specially engineered Toshiba hard drive inside. Also released is a vial that aerosolizes 1,5-dichloro-3-thiapentane to deter the insolent customer by damaging their respiratory lining.
Apple surprised many with the design of the 4th generation Nano. It utilizes a “sleeve cabinet” like that of the early iPod mini or briefly released Nano 2G. The front and back are a single anodized aluminum tube with a hole cut out for the display. The LCD occupies the top half and the main board is situated under the scroll wheel. The very thin and flexible, but highly incendiary Li-ion battery is glued to the back of the case and is about the size of a credit card folded in half. The focusing crystal is located between the LCD and the main board.
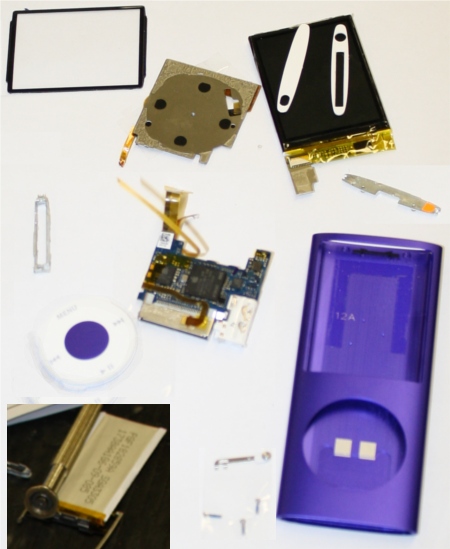
The first step is to attack the structure’s weak points: the plastic panels on the top and bottom. They are pried out by sticking a small flathead into the lock switch hole and levering. This exposes what (besides friction) holds every iPod nano together: screws and glue. The top panel conceals two 1/8 inch long screws while the bottom has three quarter-inch long screws. Once the screws are out, the metal plate attached to the top of the LCD screen is now visible. Using the hole cut out for the lock switch, the plate is pulled up. The lock switch is removed to avoid straining the flex cable that attaches it to the main board. The LCD is slid up about a half inch before it must stop to avoid damaging the display flex cable. The beveled glass screen is then slid down and out, so that the cellophane covering the flex cable can be removed and the adhesive holding the flex cable to the LCD can be weakened with denatured alcohol after unsocketing.
Easy as that, the LCD screen can then be removed and the battery, glued to the back of the case, is now visible.
After that, the battery is pried up. and the main board soldered to it is pulled down about a quarter inch to expose the click wheel connection, which is purposely engineered to screw with you. The cable end is attached to the board, and the plastic female connecter is on the end of a 90 ° flex cable that is permanently attached to the wheel above. Break that cable and you have an 8GB doorstop. After that disconnection, the main board and the soldered-to-it battery can be removed. All that is left to do is to push down on the click wheel which is held to the inside with a buttload of adhesive.
and youre sure engineering doesnt sound appealing?